6 Handmade Thanksgiving Card ideas

Celebrate the holiday season with these amazing Thanksgiving cards
I just love thanksgiving. It's a chance to put my "fat" pants on and enjoy a fantastic meal with friends and family members. I am truly thankful.
One way you can let the important people in your life know that you are thankful for their presence is to make them a handmade thanksgiving card. It's such a lovely card idea, brimming with positivity and appreciation.
Below are six handmade Thanksgiving card ideas that I hope will inspire you to get cracking on your cards (if you haven't already)!

Idea #1 - Celebrate the season

A beautiful card design using twines and die cut embellishment
By the time Thanksgiving rolls around, we are coming out of fall and heading into Winter and this Thanksgiving card idea celebrates just that. The warm tones of the leaves represent fall and the lovely white space represents the snow of winter.
How to make this thanksgiving card idea
You will need:
Red cardstock base (either DIY or pre-purchased)
White cardstock
Scraps of fall colored paper/cardstock
A leaf stencil (if you don't have one just print out a picture and cut it out to trace around)
Craft knife
Pencil
Ruler
Double-sided sticky foam pieces
Glue stick
Pen or letter stickers
Starting with your white cardstock, measure and cut it a little smaller than the face of your red card. Next, grab your leaf stencil, and using a light pencil, trace around the leaf pattern a few times on your white cardstock piece. Go ahead and cut these leaves out with your craft knife.
This white cardstock will eventually adhere to the front of the red card with sticky foam pieces to give it some depth. However, before you do that, you will need to line up your colored scraps of paper. So, here you will need to cut and arrange your colored scraps on the red card base, and when you are sure the top white layer will sit on top and only show one color neatly underneath each leaf (as per the photograph below), go ahead and stick the colored scraps down to the red card with your glue stick.

Now, before you adhere the white layer to the red card with your double-sided foam, write or stick down your sentiment first. It's easier to do it now rather than afterward.
Finally, finish off your beautiful new card by adhering the white layer to your red base using your double-sided sticky foam pieces.
Idea #2 - Use humor

Thanksgiving goes hand-in-hand with a massive meal full of comfort food. You're going to need pants with a stretchy waistband for this event!
How to make this thanksgiving card idea
You will need:
White cardstock base (either DIY or pre-purchased)
A cute turkey picture
Letter stickers
Craft knife
Sticky foam pieces
As you can see, this Thanksgiving card idea is super simple to make. Once you have all your elements, it takes about two minutes to put together!
Your cute turkey picture can be from anywhere. Although I hand-drew and colored mine, you could easily make one with a stamp or find a graphic on the internet to print out. Cut your turkey out with a craft knife and adhere it to the white card with your sticky foam pieces.
Finish off your card with letter stickers that read something like, ''Get Your Fat Pants On'' or "Let's Eat".
Idea #3 - Level it up with a tri-fold

A beautiful trifold Thanksgiving greeting card that your friends and family will surely love
Tri-fold cards are a great way to add interest to your Thanksgiving card ideas when you're stuck for new ideas. As a bonus, you can usually make two cards out of one 12-inch x 12-inch piece of cardstock.
How to make this thanksgiving card idea
You will need:
Cardstock measuring 12-inch wide • and around 6-inch height (mine is 5.5-inch)
Scraps of thanksgiving themed paper
One scrap of colored cardstock that matches your color scheme.
A DIY printable leaf.
Ruler
Pencil
Scissors
Glue stick
Scorer
Pen or letter stickers
You will need to start by measuring, scoring, and folding the base of your card. As per the diagram below, score your folding lines at 41/4-inch, 71/4-inch, and 101/4-inch.

The next step is to fold it like this:

Once you have smoothed all of your folds flat, you will need to measure and cut your scraps of thanksgiving themed paper to fit the three front-facing panels of your tri-fold. Go ahead and glue these down with your glue stick.
Next, using a scrap of plain colored cardstock, cut a long rectangle that will wrap around the whole card and glue the ends of it together so that it forms a loop that can slide on and off the card.
Finally, finish off your lovely tri-fold thanksgiving card with your DIY leaf printable and words.
Idea #4 - It's all about eating pie

A simple Thanksgiving card idea using cut out embellishments and patterned paper
How to make this thanksgiving card idea
You will need:
Cardstock base in a plain color (either DIY or pre-purchased)
White cardstock Scraps of plain colored cardstock (for your pumpkin pie and plate)
A scrap of thanksgiving themed paper
Pen or letter stickers Zig-Zag or similar scissors
Normal scissors
Craft knife
Pencil
Glue Stick
Sticky foam squares
Start by measuring and cutting a front piece from your white cardstock that is slightly smaller than your colored cardstock base. Go ahead and stick this down with your glue stick.
Next cut and measure a rectangle strip from your scrap of patterned paper, making sure it covers around one-third of the white piece you just stuck down. Go ahead and stick this piece down (on the bottom of the card as per the photographs above) with your glue stick as well.
Now ... onto the pumpkin pie!
I used a protractor to draw three different size circles for my pumpkin pie which I then cut out with scissors. The larger grey "plate" circle was cut with normal scissors and the two "pumpkin pie" pieces were cut with zig-zag scissors. You could use papercraft punches if you have them, or even trace around different size round objects like a cup.
Stick down your plate circle with your glue stick. However, before adhering the pumpkin pie, glue the two pieces together and cut out a slice (as per the photograph above). Adhere the pumpkin pie piece with your sticky foam squares so that it sticks out on the plate a little.
Finally, finish your card off with an easy banner and sentiment that can either be handwritten or stuck on with letter stickers.
Idea #5 - Remember to be thankful ... it's not all about the food!
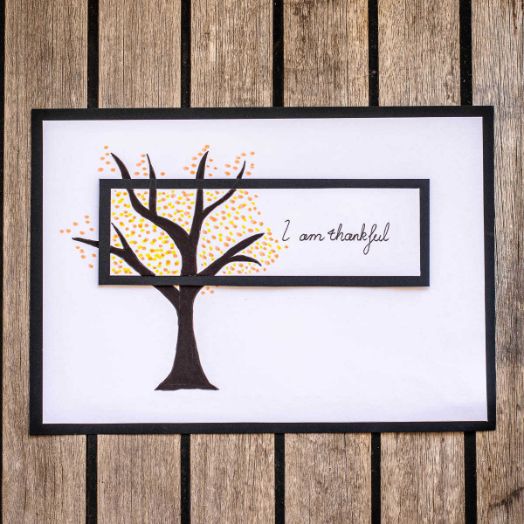
I just love this reminder to break away from the traditional imagery of a thanksgiving card and remember to just be ... well, thankful.
How to make this thanksgiving card idea
You will need:
Black card (either DIY or pre-purchased)
A scrap of black cardstock
White cardstock
Pens/Markers - Black, orange, and yellow
Double-sided foam stick squares
Glue stick
Pencil
Scissors
Start by creating your card base. You will do this by marking and cutting a piece slightly smaller than the front face of your card from your white cardstock and adhering it to your black card.
Next, measure and cut a rectangle strip from your black and white scraps of cardstock so that it looks like the image above with the white piece slightly smaller. Do not stick this down yet! However, you should glue the white strip onto the black with your glue stick.
Now, either by using temporary adhesive or by just holding it tightly with your non-drawing hand (like I did), secure this smaller rectangle in place and draw your tree on with a pencil so that it is featured on both the cardstock base and this smaller rectangle piece.
Remove your rectangle and using a marker, color in your tree trunk on both the card base and this smaller rectangle piece. While you have your smaller rectangle piece in hand, go ahead and write on your card sentiment.
Next, adhere your rectangle piece to your card base with double-sided foam pieces so that it sticks out a little, being very careful to line up the tree trunk you just colored in.
Finish off your card by adding orange and yellow colored dots (leaves) around the tree.
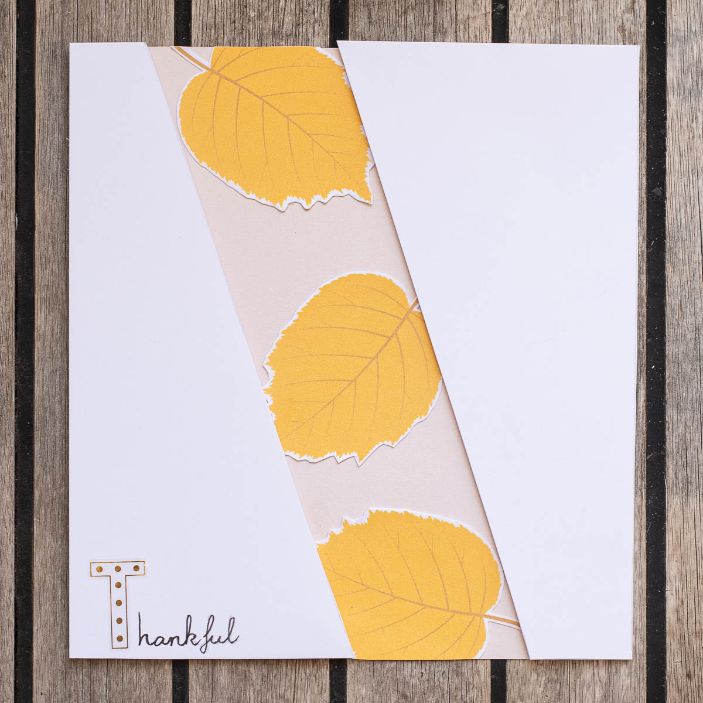
Idea #6 - Seasonal leaves
Fall leaves are a staple of thanksgiving greeting card ideas and I'm always happy when I come up with a new way to use them. This idea would also work great if you were to replace the fall leaves with any thanksgiving patterned cardstock/paper. It would probably be a lot quicker to do it this way too!
Fall leaves are a staple of thanksgiving greeting card ideas and I'm always happy when I come up with a new way to use them. This idea would also work great if you were to replace the fall leaves with any thanksgiving patterned cardstock/paper. It would probably be a lot quicker to do it this way too!
Fall leaves are a staple of thanksgiving greeting card ideas and I'm always happy when I come up with a new way to use them. This idea would also work great if you were to replace the fall leaves with any thanksgiving patterned cardstock/paper. It would probably be a lot quicker to do it this way too!
How to make this thanksgiving card idea
You will need:
Colored cardstock base (either DIY or pre-purchased)
White cardstock
DIY printable leaves
Letter sticks and/or pen
Glue stick
Double-sided sticky foam
Pencil and ruler
Scissors
Begin by cutting your white cardstock the same size and shape as the front of your colored cardstock base. With a pencil and ruler, mark and cut out a strip that runs on a diagonal from the top to the bottom of this piece of white cardstock (as per the photograph above). So now you're white cardstock piece has been cut in two with a piece missing from the middle.
Set this aside while you cut out your DIY printable leaves. Once the leaves have been cut out, stick the leaves onto your cardstock base with a glue stick, ensuring they are glued into a position where they will be seen after the white cardstock is placed on top.
Next, using letter stickers and/or a pen, write your sentiment onto the white cardstock top layer.
Finally, finish your card off by adhering this white layer onto your card base with double-sided sticky foam so that it pops out a little.
Have you started your Thanksgiving card yet?
Have you started your Thanksgiving card yet? If you haven't, I hope these ideas have inspired you to make a start. We would love to see your take on one of these ideas.
Happy card making!
Seen Our Sister Site?
Check out ScrapbookingCoach.com by clicking here.
© Copyright 2025 - CardMakingCollective.com