6 Breathtaking Spring Card Ideas
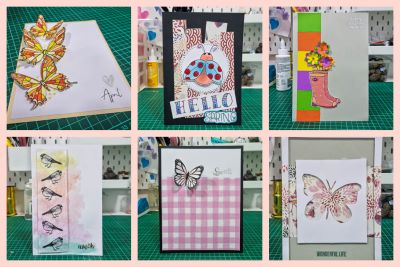
Ahhhh spring! It's my favorite feel-good season as we get to shake off the cold of winter and look forward to warmer weather, blooming wildflowers, baby bird hatchlings and butterflies. So gather your card making supplies and check out these six great spring card making ideas to give your greeting cards that lovely spring vibe.

Spring card ideas #1 - Fluttering butterflies
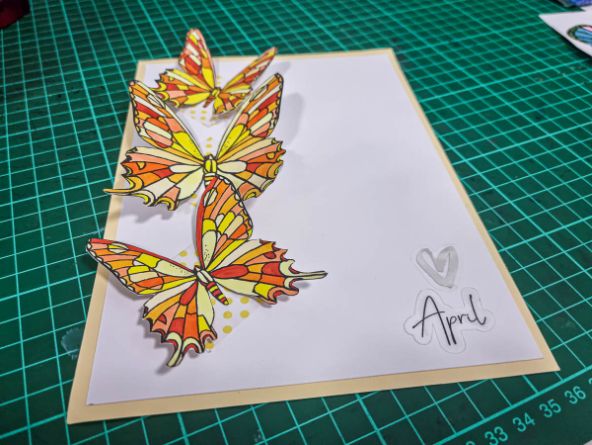
Vibrant colors works well with spring themed cards!
This easy card making idea relies on the bright, sunshine-colored, fluttering butterflies to give us that spring feeling. It's super easy to make too!
Here's what you'll need:
Card base - plain colored
Card face - white (cut slightly smaller than the base)
Print out of butterflies or a coloring page of butterflies
Markers/pencils to color the butterflies in
Scrap patterned paper
Glue
Sentiment stickers
Scissors and/or craft knife

Here's what to do:
Glue the white card front to your card base, centering it in the middle so that the edges of the card base can be seen evenly all the way around.
Cut out 3 x 1.5-inch squares from your patterned paper and glue them in a vertical line evenly down the left-hand side approximately one-third of the width of the card from the folded edge.
Grab your butterfly coloring page and go ahead and color three butterflies however you see fit. You can see from the photograph above that I have used Copic markers in a variety of yellow and orange tones.
Carefully cut out your butterflies using either scissors or a craft knife and fold the wings upwards where they join the body. Glue the body only to one of your three colored squares and repeat with the other two butterflies. Once the glue has dried, bend the wings a little more to make it appear that the butterflies are in flight.
Finish this spring card idea off with your sentiment sticker.
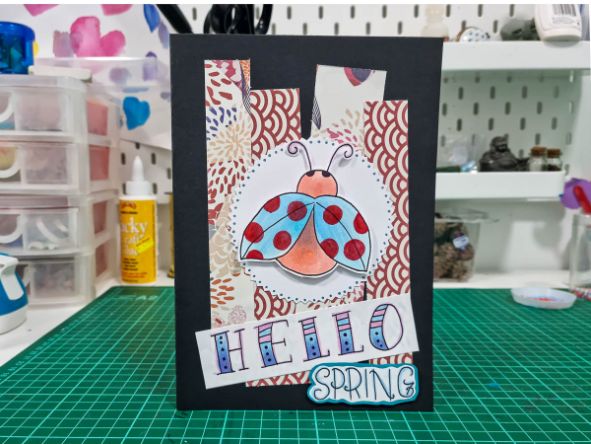
Spring card ideas #2 - Hello spring
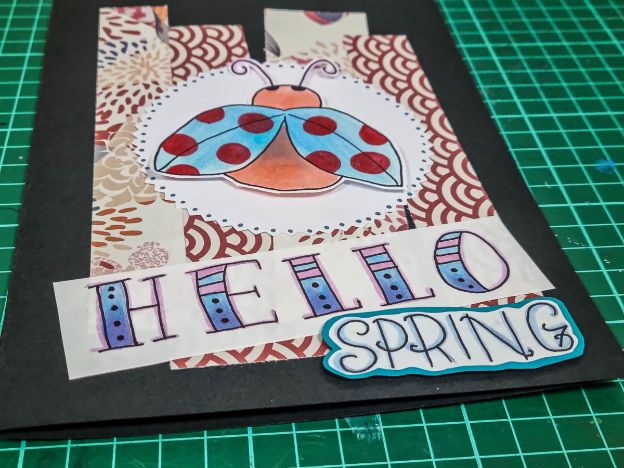
Stylize your words by using different font combinations!
Ladybeetles are known for hiding when the temperatures drops, only to re-emerge again when the weather warms up in spring. While this ladybeetle might not be traditional colored, its wings and lettering are a soft blue, a pleasant reminder of the springtime sky.
Here's what you'll need:
Black card base
Scraps of patterned paper
Scraps of white card
Pens and markers
Glue and double-sided foam tape/squares
Fancy edge scissors, regular scissors, craft knife
Here's what to do:
Cut out four strips from your scraps of patterned card and glue them to your black card base in a similar fashion to the photograph below. Next, trace around a cup or small bowl to get a perfect circle and then cut it out using a pair of fancy edge scissors. In the photograph below, you can see I have used a zig-zag pattern pair of scissors. Go ahead and glue this white circle in the centre of your card base.
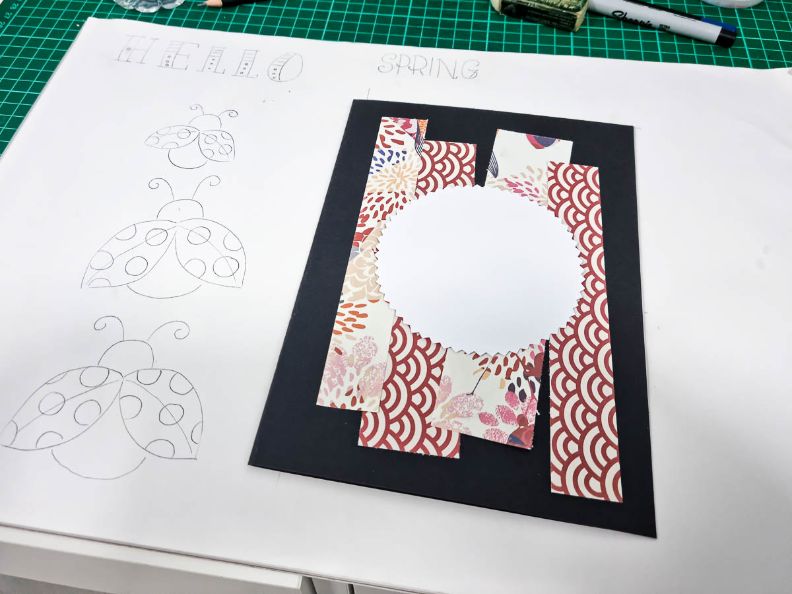
Now onto the embellishments!
In the photograph above, you can see that I have hand-drawn some lady beetles and lettering, which I colored in with Copic markers. You can either do the same yourself, use DIY printables, or find a cute ladybeetle in an old book that you don't mind cutting up.
Either way, once your ladybeetle is sorted, go ahead and cut it out, adhering it to the white circle with double-sided foam squares so that it pops out a little and grabs attention.
Style your words how you wish and also adhere them to the card to finish it off. One of my words (hello) is glued flat onto the card front, while the other (spring) has been stuck down with double-sided foam squares.
Finish this card off by using a marker to place dots around the inside edge of the white circle.
Spring card ideas #3 - Rubber boot wildflowers
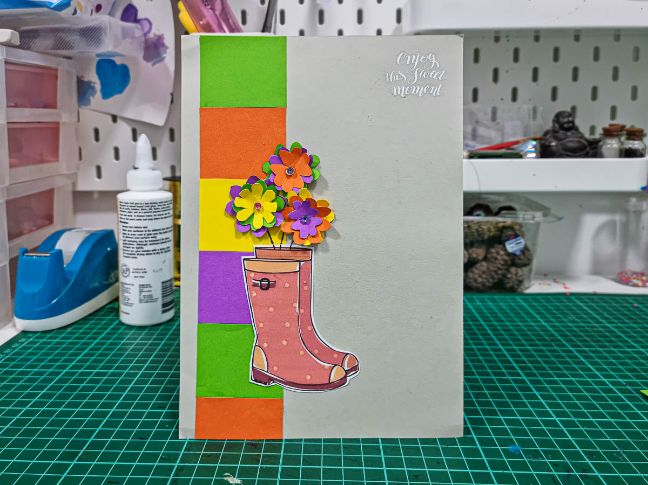
Use a subtle background design to bring more focus on your centerpiece embellishments
Nothing shouts spring-like wildflowers growing in a makeshift pot of a pair of old rubber boots in a cottage garden.
Here's what you'll need:
Card base
Scraps of colored paper
DIY printable of a pair of rubber boots
Black or dark-green marker
Letter stickers for your sentiment
A few beads
Glue
Scissors
Here's what to do:
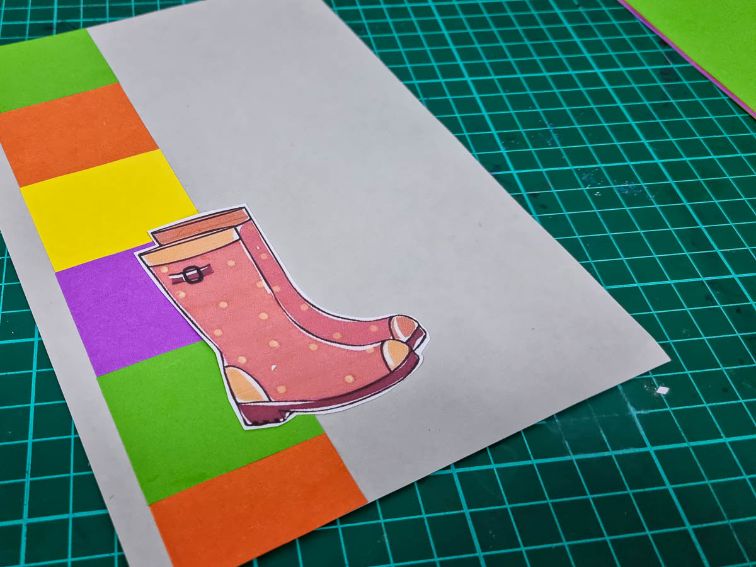
Let's start with the background and do the flowers last. Cut your colored paper into small squares of approx 1 inch and glue them in a vertical line on the left side of your card base. I have left a gap of around 1cm from the folded edge as I think it looks better this way.
Next, cut out your DIY printable of the gumboots and glue this in a similar position to the photograph below.
Now that your base has been created, let's move on to the flowers. You can see from the image below that I have numbered the photographs from 1 through 4. You will need to follow these steps in order.
1. To make one flower you will need to cut out 3 small circles. Once your circles are cut out, fold each one in half and then in half again as per the green piece of paper in photograph 1.
2. As per photograph #2, on the open edges that are not folded, draw two petals and cut this shape out. It will look a little like a love heart while still folded. Before you unfold your pieces, you need to cut two of the folded petal shorter by trimming the top of the petals. Make sure one of them is cut even shorter than the other so you have 3 different sizes.
3. Unfold your petals and make sure you now have a big, medium, and small-sized petal structure. If you need to adjust this, it's easy enough to fold them back up and trim them again.
4. Stack and glue your petals from largest to smallest, adding a bead in the middle to finish the flower head off.
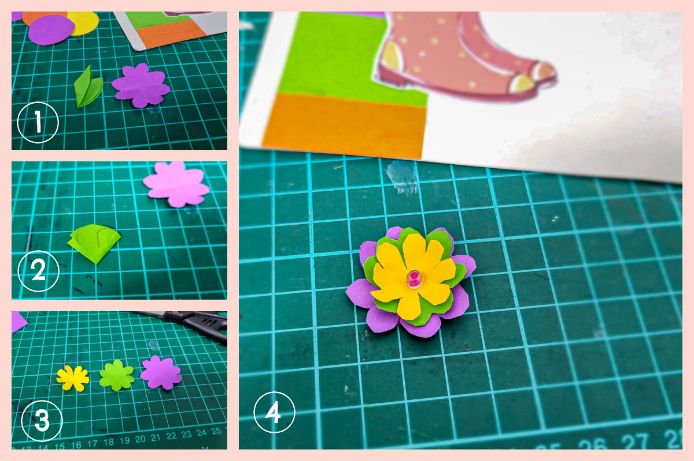
Repeat these steps for however many flowers you wish to make. Once you have enough flowers (I made 3), go ahead and draw in some flower stems from the top of the gumboots and glue the flower heads on top.
Finish your card off with some sticker letters/words for the sentiment.
Spring card ideas #4 - Spring is for birds
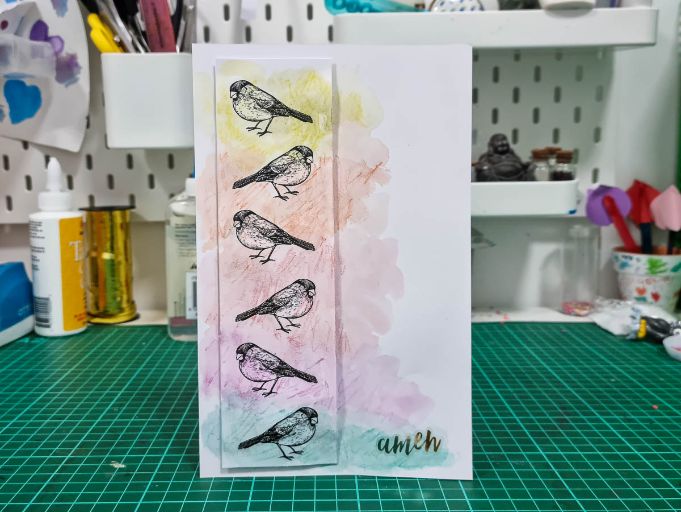
A simple card design that utilizes simple color combinations that blends well together.
This card is inspired by the adorable birds that appear in spring. They seemingly appear out of nowhere, build nests, lay eggs and treat us with their adorable hatchlings.
Here's what you'll need:
White cardstock base
Scrap of white card
Bird stamp
Watercolor pencils/paint or something similar
Double-sided foam tape
Letter stickers for your sentiment
Scissors
Here's what to do:
Cut a strip of white paper slightly smaller in height and about a third of the width of your card front. Holding it down with your fingers onto your page in the spot you eventually wish to adhere it, work your watercolor on top in various colors that scream "spring!" I've given mine a bit of a rough look because I used watercolor pencils however if you were to use paint and dab it on with a sponge you would get a much softer effect.
Make sure to hold your strip of paper in the correct spot the entire time you are working on your paint. Feel free to use a temporary adhesive if you wish. Once your paint has been applied, set aside both pieces to dry.
Go ahead and have a coffee and a piece of cake while you wait!
When your pieces have dried, stamp your birds on the strip of paper. Next, adhere this piece to the card front using thick double-sided foam tape so that it pops out. Make sure to line this up exactly so that the white card underneath can't be seen and the paint still flows visually from the strip to the card front.
Finish this card off with some letters/word stickers for your sentiment.
Spring card ideas #5 - Simple and sweet butterfly
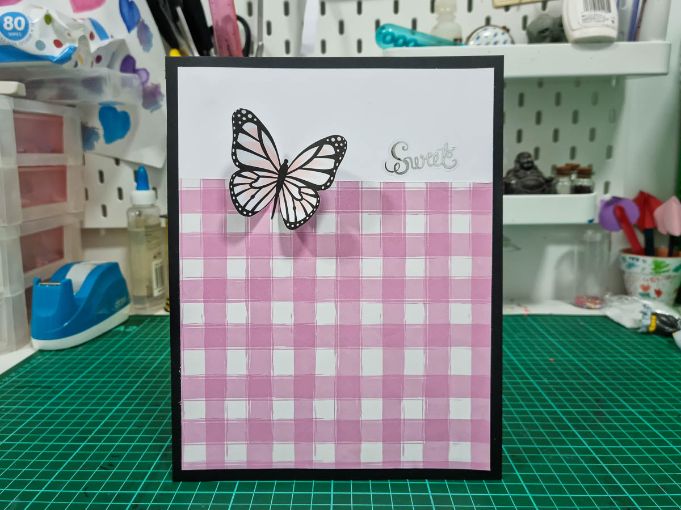
A simple card design using a single butterfly embellishment highlighted by a soft patterned background!
This card is super simple and sweet, using a soft pink color theme that contrasts nicely with the black and white to create a lovely spring themed greeting card.
Here's what you'll need:
Black card base
White card front
Patterned paper
DIY printable butterfly
Letter stickers/words for the sentiment
Glue
Scissors and craft knife
Here's what to do:
Ensure your white card front is cut slightly smaller than the card base and glue it on, centering it in such a way that the black card base creates a border around the white card front. Next, cut your patterned piece of paper so that it covers around two-thirds to three-quarters of the white card front only and glue this down also.
Prepare your single butterfly as you see fit. My butterfly was printed out earlier onto white card as a DIY printable and cut out with a craft knife. I added a splash of soft pink using a Copic Marker to tie it in with my colored card. Fold and crease your butterfly wings upwards and glue the body of the butterfly to the card. Once the glue has dried, go ahead and adjust the wings to give it a sense of depth and movement.
Finish this card off by adding your sentiment to the card..
Spring card ideas #6 - Butterfly cut out
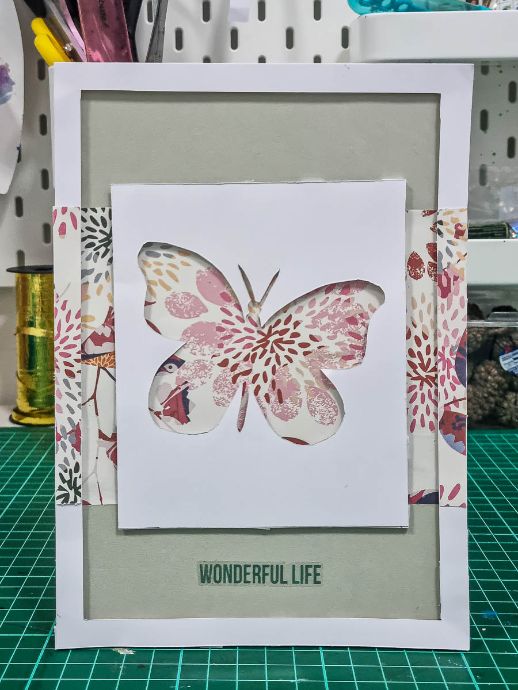
Add dimension to your design by using double sided foam tape!
Clearly, I'm in love with springtime butterflies, right? It's the last one, I promise! This design is a kind of springtime photo frame design using double-sided foam tape to make some of the elements pop out a little.
Here's what you'll need:
Neutral colored cardstock base
White card
Colored paper (spring theme)
Letter/word stickers for the sentiment
Craft knife and scissors
Glue and double-sided foam tape
Pencil
Here's what to do:
Let's start with the base of the card including the 'frame'. Cut a strip of your patterned paper and glue it to your card base horizontally in the center of your card. The width of this patterned strip is up to you but as per the image above, it must be large enough to sit behind your butterfly, yet small enough so the white piece of card can sit on top and overlap it.
Cut a white frame and adhere to the base using double-sided foam squares to make it pop out. Next, cut two small strips of your colored paper, and using your glue, adhere this on top of the frame, lining it up with the patterned piece underneath.
Cut a rectangle from a piece of white card so that it's narrower than your frame but extends higher and lower than the patterns piece that it will sit on top of (see the previous photo). When you are sure it's the right size, hand draw or trace/stamp a butterfly onto it and then cut it out with a craft knife. This white card (that now has a butterfly cut-out) can now be adhered to your card using double-sided foam tape to make it pop out a little.
Finish this card off by adding your letter or word stickers for the sentiment.
What do you think, do you like our spring card ideas?
Do you have your stash of spring themed card supplies ready? We hope you found some inspiration from these spring card ideas and would love to see your version of any of these cards!
Happy card-making!
Seen Our Sister Site?
Check out ScrapbookingCoach.com by clicking here.
© Copyright 2025 - CardMakingCollective.com